A Guide to Animation Rendering in Inventor
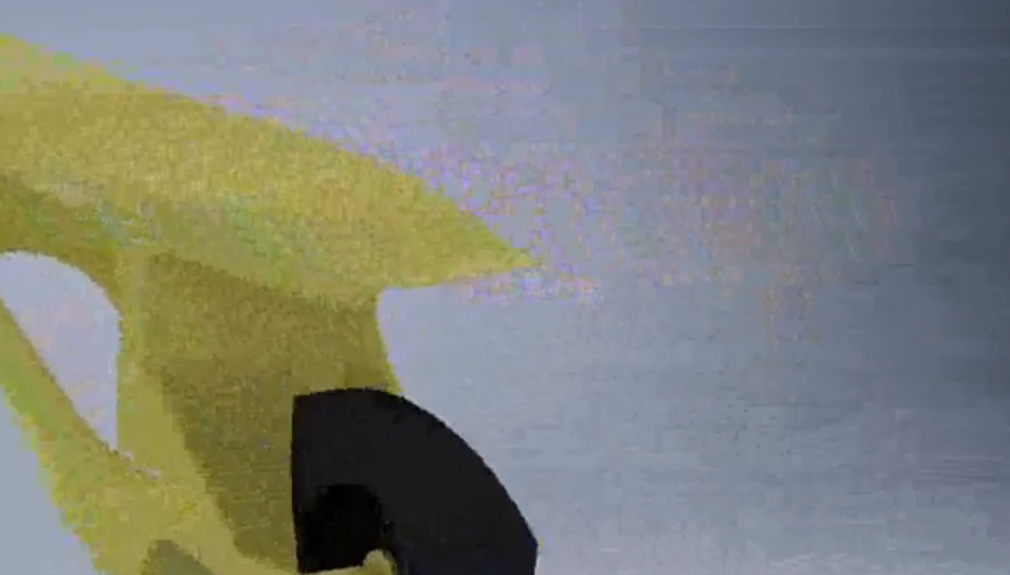
Rendering in Inventor is very simple. Just model your component, animate the component and then press render animation. You may find a menu with many settings, but if you ignore them, you can get rendering right away. If you render like that, you may end up with a result looking like this:
A complete mess. That is because the render settings that were previously ignored are absolutely crucial for the quality and clarity of a render. A pristine render requires specific settings to be altered and certain materials to be used. All aspects of the render must be chosen with care to avoid corrupted files and allow for the best render. The 3 aspects of rendering are:
- Render Settings
- Animation and Environment
- Component Detail
Render Settings
By far the most critical of the rendering aspects, the render settings control the compression and quality of a render. They also control the material accuracy of the model and its choppiness. A render can change from this:
to this:
One of things that pop out as an immediate difference between the renders is the frame rate. Frame rate controls the smoothness of the render. Choppy renders tend to feature fast motions that appear to teleport across the screen. That is due to the object moving in frames that are not rendered. In the above animations, the crankshaft is making 1 revolution a second, at a variable velocity. The first animation is at 1.5 frames per second, which misses so many frames that the shaft appears to alternate between clockwise and anti-clockwise motion. The second animation on the other hand is a 60 fps render, so the motion appears completely smooth with no teleportation. Higher fps rates pack larger file sizes with longer render times, but usually the time commitment is well worth it. Fps rates for animations will be discussed during the animation aspect, but a good rule of thumb is 30 fps is minimum, 60 fps is optimal. Another difference between the animations is the quality. Animation 1 features discoloration, pixels that do not belong, as well as many artifacts. Artifacts are transmission and compression errors during render file transfer due to file compression. Compression affects the quality of videos the most; it controls not only artifacts, but also sharpness and clarity within a video.
An example of a more extended artifact
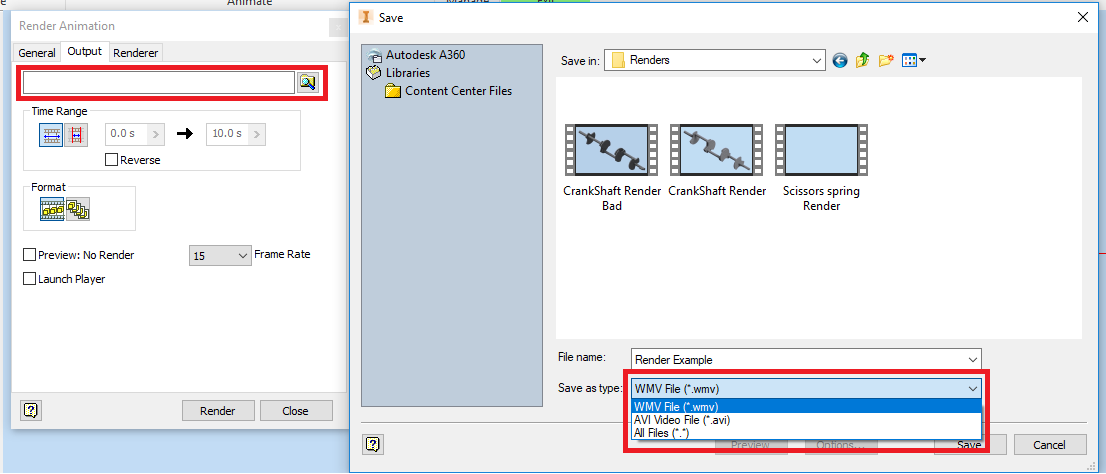
The best way to stop compression is to use AVI format as the output video file. AVI is an uncompressed format so it does not experience any form of compression errors. AVI tends to be prone to corruption, however, due to the sheer file size that is a result of the lack of compression. AVI files are so large, they cannot be played back normally at their frame rate, and require YouTube compression to be displayed. Up until now, I have not been able to render a 30 fps 30 second AVI file. The alternative to the AVI format is WMV format, which is usually an uncompressed format , however Inventor always compresses WMV files. WMV videos always experiences some form of compression. This allows them to experience less corruption and a smaller file size. The amount of compression can be changed for WMV. To change the format, go into the save directory within render output, then select the format output and change the render save name.
The high quality render displayed in the beginning is an AVI render. Compare it to the WMV example, foggier and unclear edges:
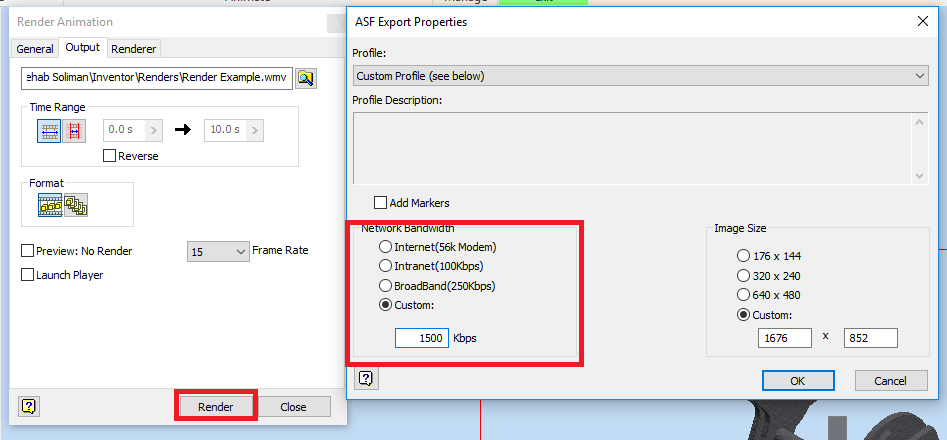
If you choose to render in WMV, it is extremely important that you change the compression settings. With default compression settings, renders are of extremely low quality, with artifacts plaguing the animation. It is a must that when a WMV is rendered, the bandwidth setting is chosen as custom, and a manual value inputted. The value inputted should be 1500, the maximum value allowed.
Example of 250 Kbps compression:
Example of 1500 Kbps compression (change of material will be mentioned later):
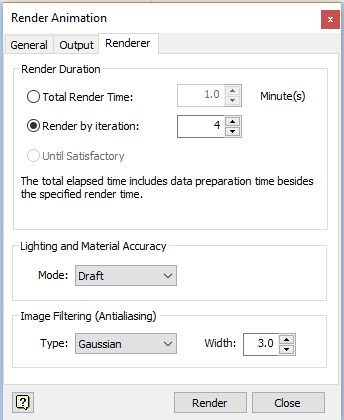
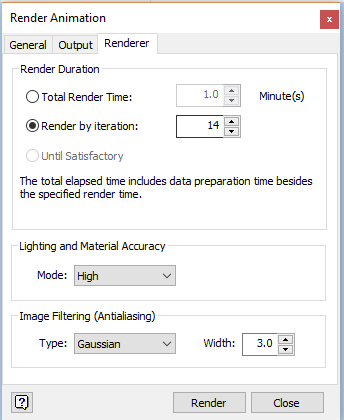
The 2 final and most simple render settings are render time (or iteration) and render quality. Render quality directly influences render time, and if time is of no object, it should be set at high. Higher render qualities lead to crisper images, but at the cost of extremely long times. Render quality dictates material accuracy and sharpens the edges of the object. Most renders look just fine at draft quality, only final renders should be rendered at high. It takes about 20 to 40 minutes, depending on material, component and animation complexities, to render a draft animation. A high setting render, on the other hand, takes approximately 2 to 4 hours, if not more. The time burden is often unnecessary, but high quality WAV renders often feature less artifacts than their draft counterparts. If animation is not rendered for long enough, it may look like this:
The static forces YouTube compression to lower the quality, making it look even worse than it should be. It is recommended to always render by iteration instead of time. Inventor rendering is almost entirely a CPU process (it uses RAM, VRAM, and some GPU modules), so it wants to use a 100% of the CPU. Running other programs during that time forces it to use less CPU so it takes more time per frame iteration. If this would happen under render time, it will cause inconsistencies in the video. In addition to that, most models take different amounts of time to render depending on the component and animation. So render time has no general value. It is recommended to take 4 iterations for Draft renders and 14 for High. Do not worry about anti aliasing, as it usually features no changes unless you mess with the custom settings. Do not mess with the custom width for anti aliasing because it could lead to funky results.
|
|
Finally, the amount of pixels in the animation can be edited, however, this usually distorts the animation window. Higher pixel number equates to longer render times and higher quality renders. 1920 x 1080p is the optimal window for upload and quality, but it usually cuts off the top of the window. Use with caution, recommended to use default window setting of the camera.
Animation and Environment
The bulk of the information about rendering is in its settings, however, animation and environment usually determine which settings should be chosen. When choosing fps, it is important to keep in mind how fast does you animation go. Slow animations, such as turntables, often do not require more than 30 fps, however fast revolution for drives or gears, demand higher frame rates. In addition, complex animations will often require higher detail and less artifacts, so that might influence you to create an AVI render as opposed to a WMV. It is also important for your animation to display relevant features to your component. For example, it would not make sense for a car fade in or out or even revolve across an axis. Unnecessary animations often lead to longer render times and blurrier renders due to compression registering more variation in pixels. As for environments, having shadows on a render cause a 6x increase in render time, so that might discourage you from pursuing a high quality render. Shadows also require more iterations to look good. Stacking shadows, models with lots of gaps, and complex animations is the best way to spend hours on rendering objects. Shadows should usually be avoided in most technical displays, and if they are necessary, animations should be kept simple and models should remain solid. Finally choosing a suitable environment for your render will drastically improve render time. Solid backgrounds with stationary lighting are the easiest for the software to render. Animating lights not only is disorienting but results in more calculations for your software to run. It also looks tacky. The simpler the animations and environments are, the more professional they look.
Component
The simpler the component, the better it will look at lower settings and the less impact the higher quality settings will have. Simple colors, straight edges, less extrusions, less gaps, simple materials and low reflectivity all make the renderers job easier, and increases the overall quality at medium settings. For example, the simplest object possible in Inventor is a cube, this is it at draft settings:
This is it at high:
Barely any difference. Usually, generic material experiences no benefit from a change in quality settings. Using other materials, however, will look better on higher settings. Shadows improve under better settings, and so do materials with textures or reflections. Reflective materials should be avoided however, if using WAV and an infinite mirror cycle occurs. Take the scissor animation for example. High reflectivity loops causes more pixel updates per frame, which when compressed, cause an increase in artifacts. Both use WAV format (the red scissors are at higher compression however) yet the metals scissor experience long artifact lines. One of the most important object characteristics is if the part is an assembly or part file. Part files tend to be so simple that they can be reasonably rendered at default bandwidth if they move slowly enough. The simpler the object the easier the render, the shorter the render time.
That is it for my research. In conclusion, the most optimal settings for a render are a high quality AVI at 60 fps, but usually draft quality at 30 fps is sufficient. If AVI does not work, WMV at 1500 kbps provides a reasonable alternative.
